Openers · Welland
Photo-Eye Sensor Alignment or Replacement
You press the remote, the door drops a few centimetres, then climbs straight back to the top while the opener light blinks. Nothing is under the door.
Photo-Eye Sensor Alignment or Replacement
In plain words
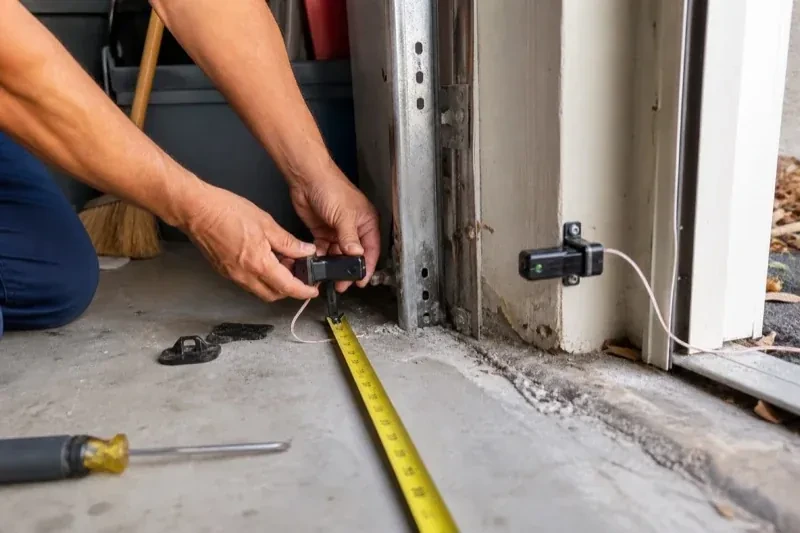
Most sensor visits end in alignment rather than new parts. The brackets that hold the sensors ride on the door track or the wall, and they get bumped by bins, tires and shovels until the two lenses no longer look at each other. The technician resets both sensors to the same height, loosens the wing nuts, aims the pair until the receiving light holds steady, tightens everything and secures the wire. Replacement is the answer when a lens is crazed, a housing is cracked, water has got inside or the indicator stays dark with good wiring, and then a pair matched to the opener is fitted.
How the visit goesOn bright mornings the door will not close, then by lunchtime it behaves itself. The garage faces the low sun, and the light reaches straight across the floor to one of the little black sensors.
Welland
How the visit goes
Clearing and walking the beam
Before anything is adjusted, the technician clears the strip of floor between the two sensors and looks along the beam line at sensor height. Things that break a beam are rarely dramatic: the corner of a recycling bin, a hose left coiled by the wall, a bag of salt, leaves blown in under the door, a cobweb bridging a lens, a new weatherstrip or track shoe that sits a little proud. Snow and ice piled inside the door in winter count too. With the path clean, the door is tried again, because a fair share of sensor calls end right here, with a lesson about where things can and cannot sit.
Repairing the wire run
Damaged wire is dealt with in whole sections rather than patched at a single point. A pierced or chewed length is cut back to sound insulation and either spliced with proper connectors or, more often, replaced from the sensor to the nearest good junction. Where the run has failed in more than one place, a fresh two-conductor wire is stapled from the motor housing across the ceiling and down both sides of the opening, kept clear of the track, hinges and the door's travel. At the head unit the pair is landed on the correct low-voltage terminals with polarity confirmed, and the sensor lights are checked before anything is tidied.
Two lights to glance at
You leave knowing what normal looks like at the floor. Most sensor pairs carry a small indicator on each side, often in different colours for sender and receiver, though some older pairs light only the receiver; the model's own chart tells you what steady and flickering mean. A dark or flickering light on the receiving side means the beam has been lost, usually because a bracket was bumped or something is in the path, and two dark lights mean the pair has lost power along the wire. A glance at those lights before calling anyone tells you most of what the technician would look at first, and often the fix is moving whatever is leaning on the bracket.
Photo-Eye Sensor Alignment or Replacement
In the van
- Concrete anchors
- Wing nuts and carriage bolts
- 2x4 test block
- Receiving-eye sun shade
- Protective wire channel
What affects the quote
Same fees day, night or weekend
1Length and route of the wire run
A damaged section near a sensor is a short repair. A fresh run from the motor to both sides of the doorway takes longer, more so where the wire is buried in a finished ceiling.
2Bracket condition
A bracket that can be straightened costs little time. One that is cracked, rusted through or missing is replaced, and a change from track clips to wall or floor brackets adds anchors and mounting work.
3Opener make and generation
Sensor pairs are matched to the opener family, and some models take a kit with brackets and wire while others take sensors alone. The head unit label sets which pair is needed and how it is priced.
Photo-Eye Sensor Alignment or Replacement: questions
How long does a sensor visit take?
Alignment, cleaning and a bracket adjustment are done inside an hour on most doors, including the two tests at the end. Replacing the pair adds a little for wiring and setup. Re-running the wire all the way from the motor to both sensors is the part that stretches a visit, especially where the wire is behind a finished ceiling or the garage is full. Having the floor by the door clear before arrival helps.
Is it all right to keep using the door until the visit?
Use the door in a way that keeps you in control. If the opener closes only while the wall button is held, do that only while you can see the whole doorway and nobody is near it. Otherwise close the door first if you can, then move it by hand with the manual release, and get help if it feels heavy or binds. Keep children and pets clear during any test. A door that reverses is being cautious on your behalf.
Will the sensors need replacing or just aligning?
Most visits end in alignment, cleaning and bracket work, because the sensors themselves are hardy. Replacement comes into it when a lens has clouded or crazed, when the housing is split or holds water, an indicator stays dark with the wiring proven good, or the pair is from a different generation than the opener and is never recognised. The technician tests before choosing, so the parts list matches what the door needs.
Openers & Access
- Chain-Drive Opener RepairPress the button and the opener hums for a second, then quits.
- Belt-Drive Opener RepairHalfway up, every single time, the door hesitates and there is a ratcheting sound from the motor…
- Garage Door Opener ReplacementSince the storm the door behaves oddly: it reverses halfway down for no reason, the light flickers…
Photo-Eye Sensor Alignment or Replacement near you
Households in Welland mostly need three things from us over the life of a door: a tune-up now and then, a spring or cable when one lets go, and a new opener or door when the old one is finished. Every one of those, plus the smaller jobs between, is covered below.